The first couple or three Christmases we were married, we made a big deal of going to one of our local tree farms to select just the tree for us. They were beautiful and took up a good portion of our narrow living room. They smelled of winter and joy and peace on earth all wrapped up in sparkling lights and tulle ribbon and ornaments that came from my single apartment days mixed in with the ones I bought as a wife and soon to be mom.
Then, more babies came, and they started to crawl and climb and break things, despite their oh-so-sweet natures and our best childproofing efforts. The year I had an almost 3-year old, a 21 month old, and a newborn, I convinced myself a tree was out of the question. I was doing good to keep the doors on their hinges--how could my sanity survive putting a Christmas tree in the same house with those people? So, Christmas neared, and our home had no tree. And I wished that it did and lamented my decision. So, that man I married brought home our first miracle tree. Not from a tree farm or Walmart or Lowe's, not trimmed or shaped or trained. And it was ugly, but as I looked at it skeptically, he assured me it would be just fine. So, trimming a branch here and sticking it in somewhere else, all around, little by little, he shaped and readjusted, and that tree became our beautiful Christmas tree. We jokingly referred to it as our miracle tree.
Each year since, in that house and in the five Christmases in the barn, we found our miracle trees. Part of the fun has been tromping through our woods, all eyes out for a cedar that looks halfway like a Christmas tree. If it has just a little potential, we can take care of the rest with a pair of clippers and fishing line. Some years, I've cut it, and others my husband has. Some years it takes branches from more than one tree even. But after it's shaped and turned to its best advantage, the same ornaments I bought as a single teacher and the ones I bought to commemorate our first Christmas and the porcelain gift ones are joined by the ones our three kids have made. Salt dough ones that slightly resemble candy canes.....the paper balls a sweet friend patiently helped them glue together.....tree shapes made from our own red clay when we experimented with brick making....the list goes on. Each one is precious and brings to mind a mess when it was made and the fun we had and how fast these years are flying.
In the barn, really, only we and our parents saw our Christmas trees. We just didn't have room for much company. But now we are in the house, and I am so looking forward to sharing this time of year with family and guests, to lots of laughter and cider and red ribbon. To Santa Claus coming down the chimney instead of the electric heater vent, or even more disappointing, the door. To our first Christmas memories in our new home. And so, I came really close to giving up the tradition of the miracle tree. I told myself the fun was in decorating anyway, that we would focus on that part. Wouldn't a really full, shaped, "professional" Christmas tree be beautiful? But, you know....I can't find any good Christmas tree farms around here, and after so many years of getting trees off our own place, the idea of picking some tree I don't even know out of a pile just started to seem impersonal. So, we took a walk this past Sunday afternoon.
We walked all over our place. We are so rich in scraggly, skinny cedar trees. All five of us and the dog tromped through the woods, eyeing the fencelines and any clump of dark green among the yellow and browns and reds of the hickories and oaks and sweet gums. Just before we headed down the path, my husband climbed in a sweet gum and taught us how to chew the sap. Not a threat to Wrigley at all, but still pretty good. And, sure enough, as we walked and as he and I saw for the millionth time lately how much the kids are growing and how much fun they have just exploring our little world, we found two potential miracle trees. The top nine feet of one will be our Christmas tree this year. I know these trees. They're ours. They've absorbed the sounds of our family, of a chainsaw cutting logs for our home, of the kids' whispers when they think they're hearing war drums deeper in the woods (band practice at the nearby high school a few miles away), of me calling my cat of 10 years who disappeared in June, of yells and laughter and squeals when we sled down our one good hill when we get a rare snow.
So, it'll come in the house, and my husband will turn it until I say I think most of the bare spots are facing the wall. We'll dress it up with ribbon and sparkles and ornaments from the gawdy to the precious, and this year, it will be our miracle tree. And I can't wait!
Monday, November 19, 2012
Thursday, May 10, 2012
Water and electricity!!!!
We now have electricity and running water! No more running extension cords through the windows. Here's a picture of the kitchen sink and cabinets, with the counter top my husband made from some of that post oak we've got. We've had a wooden counter in the barn the past several years, and I love it. I've had that shade of blue for the cabinets in mind for years, and the sink we got at a junk place in town for next to nothing.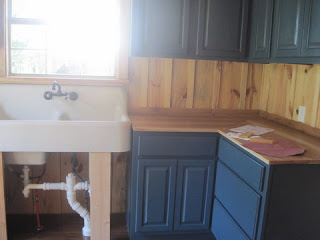
This is a little bar area with a storage cabinet, as you walk from the kitchen back toward the hall and stairway. 


Well, there you have it! We still have some major cleaning and the wood finishing for the ceiling and walls to do. We're using raw linseed oil for that and found a great hardware store out of Houston, Cox Hardware that beat any other prices all to pieces, even with shipping this far. That arrived this week, so we're itching to get started on this last leg of our adventure/nightmare/dream come true! I'll add more soon!

Thursday, March 22, 2012
Floors, baseboards, doors, and cabinets....
 Here are samples of what our bathroom floors will look like. We have gone through a myriad of possibilities with this. After checking prices and reviews and specs on several options, VCT seems to be the best fit for us. We went with an alternating pattern to avoid that school cafeteria look. I love what we picked. We priced several places, and we ended up going with a flooring outlet here in town that sold it to us at a fraction of what other retailers told us, for the same product. One full bath and the downstairs half bath will have the green and white, while the other full bath has the violet and white.
 Here's our kitchen with cabinets! We have never installed cabinets before on our own, so we were fairly edgy about this and not sure how to make it all come together, especially considering the beams and braces on some of the walls. My dad, however, put our minds at ease as he looked at it with the eyes of years of experience and remarked, "...shouldn't be a problem." Within one day, he and my husband made some exchanges and additional purchases at Surplus Warehouse and got these up. I have had no cabinets here in the barn, just a few open shelves, and about a yard of counter space, so this kitchen seems just luxurious to me! We went with Surplus Warehouse on the cabinets partly because these don't have particle board in the sides. I want to paint them a deep slate blue. Next, we take the stove to a guy we've found to go through it and get it all up to date.

My dad came and spent most of the week with us last week and they got so much done with two really good carpenters instead of one really good carpenter and a helper who is also the mom.
You can see the louvered doors we chose for in front of the washer and dryer downstairs. The house has tons of natural light, but not in this particular spot, so we wanted some kind of door that would allow light to filter into the hall. These did the trick just fine. After talking to Home Depot and not wanting to pay $100+ in shipping, we went with a local lumber company who was able to get the doors in one unit for about the same as the base price from Home Depot. They had them ready in about a day. We also bought the rest of our interior doors from a local company. They framed them for us, too, which made installation so much easier. They are solid pine, and I want to stain them, as well as much of the wood, too. The whole paint/stain issue is really a tough one. I love the look of the wood, but in some rooms, I think I do want to paint the walls, but still just stain the beams, braces, and baseboards. It's hard to think of covering those boards with paint until I see a picture of a timberframe home with painted walls, and then I think it should be done in moderation.

Here's a shot of our baseboards. We ran the wiring along the base of the wall, so this thick baseboard conceals that as well as complements the beam at the top of the wall really well. The electrician we used was really good about wanting to work with our wood to conceal his wires as much as possible. This baseboard really gives each wall a picture-frame effect with the beams running horizontally and vertically.
 And a final pic of the kitchen. We are almost done!!!!!!!
Friday, February 24, 2012
Too busy to post lately!
 It has been months since I've added anything here, but the work has continued steadily all through the fall and winter. It's been two years since our old Farmall headed into the woods down the hill to bring up the first logs, and now we are only weeks away from finishing. It's wild how familiar it all looks to me, something newly constructed, but a house we've seen on the cover of that book for years now. Since my last post, walls inside have gone up, and we hired our first outside work since the sawyer that milled our logs into beams when we had the electrical/heating and air/plumbing done. When I say "we", I really mean my husband, and that man has also built the stairs and is in the middle of installing the floors.
In the living area, we have this partition which gave him a good way to conceal pipes from upstairs, plus it adds natural zoning to this area. We read a book a few years ago by Christopher Alexander, A Pattern Language, I think it was, and he really influenced our ideas about spaces and how to define them within a home. Extremely dry, wordy reading, and not all practical, but we got a lot out of it. We found him as the result of a detour several years ago that led in a circle back to this design. Every obstacle has learning opportunities!

Here's the view of the stairs from beside the fireplace. He used a book he bought, Stairs, from the Taunton Press Fine Homebuilding series, to build them. We've been very impressed by any Taunton Press building books we've seen. We were concerned about the stairs seeming crowded since there's not a lot of room in that stairwell, but they turned out just right. These are oak and have so much character about them. You can see the one I took from the top up above. The math girl in me loves all the angles and lines in this house.

And here we have the floors! The real floors! Our kids love sliding in their socks in the rooms that are completed. There's a story behind these floors. We had a ton of post oak we'd planned to plane for floors, but since this is our first (and last, we hope) time to build a house like this, we didn't realize that planing post oak is like planing concrete. My husband got a little done, just enough to see just how gorgeous post oak is, and then we realized it is near impossible to plane it! We even took it to a guy with an industrial setup who called us the next day to come get our wood, said he didn't want to fool with it. At that point, we kinda felt between a rock and a hard place, all this wood that we'd fallen in love with, that we've had drying for two years, and no way we could figure to get it planed. We did have a couple of offers that were a couple hours away, but after our experience locally, we hated for those guys or us to waste their gas money on what was turning out to be a wild goose chase. That all told, we ended up taking one of our first true shortcuts--we bought pre-finished flooring from Home Depot. It is solid wood, so we can refinish it someday when needed, but there's no sanding and finishing for us to do! It's 3" red oak, a dark stain (which was darker than we'd thought it would be, but, once again, once it started covering the floor, oh, how beautiful it is and I wouldn't want it any lighter), tongue and grooved, so that all we have to do is lay it out and nail it down. Here's a couple of pictures from last week when it was being put down upstairs. We are now working on the downstairs, and it goes down really easily. There have been some that we had to cull due to defects, but not many, and we can still use them up against the wall.


And the fireplace! Oh, I love it! I don't mean that bragging at all--I have nothing to brag about--I'm so proud of the work my husband is doing on this house. This fireplace took forever, but it's the centerpiece of the house. And if it works as well as the one we had at our old home, it should save us a lot on heating bills. I may have already explained this, but I don't remember.....anyway, it doesn't work like a regular fireplace. You build a fire, which warms up the bricks. After the fire goes out, that heat continues to radiate out. There are channels inside it, and it continues to warm the home for hours after the fire is out. And it just feels wonderful to lean against come morning time! He installed a bake oven in this one--I hope I can figure out how to use it well! We got our hearth from a local business--it's granite and has a beautiful marbled mix of several colors.


Well, that really sums up the past six months. In between these pictures have been hours and hours of building and researching and making trips to town for more supplies to keep on building, and hopefully it won't be long till the whole thing will be done! I'll try to do better about posting, too, till then!
Saturday, August 13, 2011
Fireplace and floor....
 After two 200 mile round trips to get bricks and hours and hours and hours of perfecting the science of refractory cement and then brick mortar, the fireplace is done up to the ceiling of the first floor. We've still got to carry the chimney up past that, but what a relief! I think he did such a wonderful job. Our old one in our previous home didn't have a bake oven like this one.


I can just imagine coming downstairs this winter and leaning on those bricks. I have missed that while we've been in the barn. You just can't lean on an electric wall heater. The fireplace faces the living room.

Time for more floors! As usual, there were lots of options. We had initially planned to use some of the wood we'd had milled off our place for the floors, but it ended that oak took forever to plane with our planer and the local sawmill just doesn't have time for it right now. My husband saw this fir at Lowe's and got it. We used 2x4's and did one layer, wedging them tight and applying sealer between them. It's just beautiful and I think it will work out really well. This is what we're doing for the second floor. There is some tongue and groove post oak that my husband can't quite get out of his mind, and I predict we end up going with that or taking the time to plane our own for the first floor.

It's neat to see the areas taking shape rather than it being one big room up to the attic. This one is the kitchen.
Here are the stairs roughed in. My husband used a plan he found in a book about building stairs to get the same shape as the one in Jack Sobon's book. This is really the only staircase that fits in the stairwell space, but I really like the lines and angles of it.


This one is the view from the front of the house.

You can see the side of the fireplace that faces the kitchen here, before the stairs were built.


This one is the view from the front of the house.

You can see the side of the fireplace that faces the kitchen here, before the stairs were built.
We're getting there one step at a time.
Monday, July 11, 2011
Slow but steady...in the middle of the masonry heater
 This is some fabric I found a while back at Walmart, and it just goes with the house. I found the coordinating print below online. I plan to use them as curtains and whatnot in the kitchen.

My husband left his work hat on a peg, and I just thought it made a neat looking shot.
 Here we are....actual progress on the house. You can see all the layers up to the subfloor here.
 Time to start laying out the masonry heater components. He actually built one for our first home, but this plan is a little bit different. We were able to get the concrete supplies locally, but we ordered the iron pieces from North Stone Heat. We were very pleased with their customer service.
 Take a step back to see the whole picture at this point.
These pictures didn't upload in my order, but here is one from just before he started putting the masonry heater up.

In these you can get a better idea of the space and layout since the subfloor is done. This is looking from the stairwell toward the kitchen and side door. There will be a wall just to the left of the door that comes out about 10 feet which will run behind the stove, refrigerator, and some of the cabinets. On the door-side of it, we plan to put shallow cabinets and a place where workboots and jackets can be stored. To the right of the door will be a small half-bath, the hot water heater, and the washer and dryer.

Before he could start putting the heater together, he had to make some slabs with these forms. We used Spargun 28 and 30, I believe. You can't see it here, but one of them has a hole in the center. It cracked the first time he poured it, but the second time he used a foam piece in the center, and it did just fine.

Starting to lay the firebrick. It's a really neat technique to laying these. You make a pretty runny mortar and then dip the bricks in it before sticking them in place.

In this one you can see where the chimney connects and how the channels are layed out.

These two inspect everything that goes into the house.

Looking at the fireplace from the front door. It's about 4 feet across and I think around 2 feet deep.
 The front faces the living room. The top opening will be a bake oven. How cool is that! As the wife and not the one actually building it, I can say that. In this one you can see how the firebox has a slanted base to make the ash drain better.
 Inspector #2 gave it her okay. You can see the color of the brick that will be on the outside. It's from Acme--Boston Red.
The butterfly was hanging out around the fireplace and let me get so close. There was something about the mortar it liked.
Here's our stove! This is not  actually ours, but a picture I found of one just like it. My husband found one on Craigslist not far from here. I got online to research the company--It's a Country Charm electric stove from House of Webster. They made these modern stoves inside an 1875 cast iron design from the late 1970's until 2001. I spoke with the company and we can get any parts we need, so we went ahead and got it for a super deal today. The ventahood is hidden by what looks like warmers, and the coffee grinder is the clock/timer. The dials are hidden by the cast iron covers on the left side. It's not the smooth surface, self-cleaning model I was looking at, but we both fell in love with this one. And since I've never had a smooth surface one, I won't miss it. And it is sturdy, weighing around 375 lbs. I think it will be perfect in the house.
 actually ours, but a picture I found of one just like it. My husband found one on Craigslist not far from here. I got online to research the company--It's a Country Charm electric stove from House of Webster. They made these modern stoves inside an 1875 cast iron design from the late 1970's until 2001. I spoke with the company and we can get any parts we need, so we went ahead and got it for a super deal today. The ventahood is hidden by what looks like warmers, and the coffee grinder is the clock/timer. The dials are hidden by the cast iron covers on the left side. It's not the smooth surface, self-cleaning model I was looking at, but we both fell in love with this one. And since I've never had a smooth surface one, I won't miss it. And it is sturdy, weighing around 375 lbs. I think it will be perfect in the house.
Anyway, there's a quick catch up on our progress--we're getting there slowly but surely!
Thursday, May 19, 2011
Interior paint thoughts....
On the Behr site, you can play around with the colors on either sample photos or your own uploaded pics. I was up way too late last night experimenting with different colors and shades for the kitchen and the living room. Since this is all one open space, I need to choose to choose colors that go well for the whole thing. We'd been thinking we'd leave the walls a natural color downstairs, but now we're leaning toward painting the walls and window frames but leaving the beams and braces and ceiling the natural wood color. Here are my favorites so far. I used the sample photos from their site since we don't have the window framing and other trim up, so ours won't be just like this, but it's generally how I would do the same colors. Our rooms won't look near as polished and will be simple wood paneling with battens. Our ceilings won't be painted, either. At least I don't think so at this point.


Subscribe to:
Posts (Atom)